|
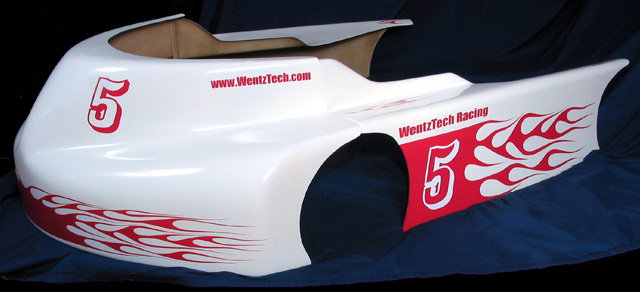
Creating The Flames Kart
|
 |
|
|
|
Cleaning the surface to remove mold release and wax Preparing the graphics for installation Squeegee the shipped graphics to remove any bubbles or wrinkles that may have developed during shipping. Don't worry about any wrinkles or bubbles over the area where there is no graphic.
Test fitting the graphics Making sure the bottom edge is even with the kart body Double checking we still have a good alignment after tacking it down in place.
Note that there is a large area over the front wheel cut out. This will be trimmed away later. This is a feature of this graphics set. It allows you to place it on your kart and trim for the wheel cutout. Installing The hinge at the top
The hinge installed Wetting the surface Removing the backing Removing the backing the rest of the way Getting ready to drape the graphic onto the surface of the kart with a squeegee Sqeegeeing out the water and air. Working from the center out Squeegeeing any remaining water/air out There where some larger bubbles under the large red section. Kyle is working them to the edge with the squeegee. We did not get them all out during this process see below. Removing the hinge Wetting the masking tape to make it easier to remove Removing the masking tape. He had a hard time getting it started, as the extra vinyl was just hanging over the wheel well and not attached to the surface. We added a little more water to the masking tape, gave it a little time to soak in, and then carefully removed it. Removing the masking tape We had some bubbles left over as you can see in this picture.
We worked what we could with our fingers to the edge of the vinyl. Trimming away the extra over the wheel cut out Trimming the rest We left about 1/32 of an inch overhang at the bottom. Kyle is trimming it away. Final trim Arranging the number over the already installed flames. Adding the hinge Wetting the surface Squeegeeing the 5 into place Working the bottom of the 5 Working any bubbles to the edges Removing the masking tape Positioning the WentzTech Racing Letters Cutting the 2 words apart. This makes them easy to install. The hinge will hold them into alignment. Squeegeeing the first word down Removing the masking tape Removing the masking tape Side of the kart completed Positioning the first side of the nose. Note where we put the hinge on this one. The front of the kart is a simple curve. We are installing this graphic in 2 pieces. Alignment is critical Note the hinge on the small side of the graphic. Wetting down the surface Removing the backing Removing the backing. Squeegeeing the graphic starting at the hinge.
Wetting the masking tape to make it easier to remove. The vinyl wanted to lift off of the surface when we removed the masking tape. Kyle is holding it in place with his thumb while pulling the masking tape back on itself. The rest of the graphic was fine once we got it started. The very ends of the flames lifted from the surface of the kart during the masking tape removal. Kyle is pushing them back down with his fingers. Using the backing that we removed. Kyle is working the section that lifted up when we started to remove the masking tape. Use the backing shiny side up. This protects the vinyl from being deformed by the squeegee. The other side of the graphic is going to over lap. Kyle is cutting it close to the edge with a scissors to make aligning it easier. Positioning the graphic for a good fit. We left about a 1/16 overlap. Tacking it in place so it does not move. Tacking the other end in place. Adding the hinge. It is placed over the top of the already installed vinyl. Removing the backing Squeegeeing the vinyl into place. Wetting the masking tape to make it easier to remove. We had the same problem here. The vinyl wanted to lift off the surface of the kart when we tried to remove the masking tape. Kyle is holding it down to the surface of the Kart with his thumb. Removing the tape. Note how it it pulled directly back over its self. Smoothing out the pulled up vinyl with his hand. Some of the flames lifted also. Here they are being smoothed back out. This one had a hump in it, and could not be smoothed back out by just running your finger over it. Kyle is lifting the tail of the flame off the karts surface, slightly pulling it, and then laying it back down into position. The completed nose. Both the number and name were positioned on the Kart at the same time to make sure they where visually appealing. Wetting down the surface. Removing the backing Squeegeeing into place. Wetting down the surface under the www.WentzTech.com Ready to be squeegeed into place. Squeegeeing into place. Removing the masking tape from the 5 And the www.WentzTech.com The completed nose with number and sponsor The large flame kit also comes with a few other smaller flames. Here Kyle is placing them on the top section of the Kart. Squeeging them into place. Placing the hinge on the rear graphic. |
|
Remember there is nothing hard about any of this. Take your time and plan your work. All the techniques are basically the same. Have fun installing your graphics. Your Kart will stand out at the track and be noticed! |
|
All Graphics Copyright 2002-2010 www.WentzTech.com
|